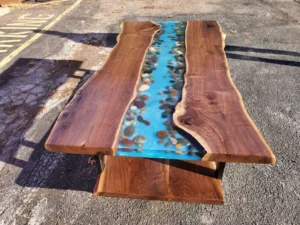
Making an epoxy river table out of molding epoxy is a project that many DIY enthusiasts want to achieve. To carry out this kind of project, it is important to understand the principles of mass-casting epoxy. I will share here the tips of the trade to make a beautiful wooden and epoxy table.
Tips to Make a Beautiful Wooden and Epoxy Table
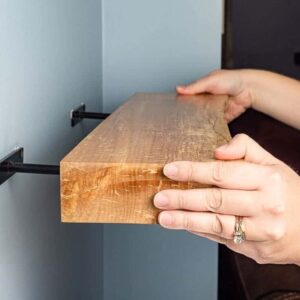
Practice First On a Small Model

My first tip is to take on a small project before going on a big adventure. A small side table, bedside table, or decorative wood shelves are examples of small projects to complete to develop your experience.
Epoxy River table: it starts with a good waterproof mold
The first step is to build a waterproof mold. This should be made from a sturdy and smooth material. Normally, melamine is a material of choice. It must be perfectly waterproof because the molding epoxy (epoxy casting) is particularly liquid.
Related Resource: How to Make a Standing Desk Look Attractive
Your mold could empty some of its contents if there is even a small open joint. When I build my molds, I use Lepage No More Nail glue to secure the edges. Once assembled, I seal the interior ridges with a micro-gasket (very thin) of acrylic caulk or clear silicone.
On the joints on the outside, I apply red Tuck Tape Isoclad tape. Thus, I make sure that there will be no loss of epoxy.
“Grease the mold” to help release the epoxy
Although melamine is not porous, casting epoxy is very tacky and tends to stick as it cures. I highly recommend that you coat your mold with an aerosol release agent. This will greatly facilitate the demolding in the end. Instead of the mold release agent, carnauba furniture wax (Carbamex). It can also be used. After testing we noticed that Carbamex wax works best on a mold.
Read More: How to Refinish and Restore Old Wood Furniture
Prepare the pieces of wood
The pieces of wood to be incorporated into the epoxy must be clean and free from crumbly bark. In order to minimize the risk of bubbles, it is important here to completely seal the portions of wood in contact with the molding epoxy.
Especially the ends of the boards, the thickness, and the portions showing knots or the beginnings of branches. Wood contains air. This air is likely to escape when the piece of wood is heated for many hours by the epoxy that has been poured.
The best way to seal your pieces is to apply a thin coat of epoxy. Regular Epoxy Nu-Luster 55 works very well. A 473ml container is normally enough for me for a 2ft x 4ft table. After pouring a small bead that I spread everywhere with a brush, it will be necessary to let dry for at least 24 hours.
For this step, some use varnish, lacquer, or shellac to seal. Personally, I have better results with a thin coat of epoxy. This is what the epoxy manufacturer recommends.
In the case of a table where only the river is epoxy and not the top, you can seal only the thickness of the boards in contact with the epoxy. The wooden table tops can remain natural or be oiled, for example.
Secure the Pieces of Wood to the Bottom of the Mold
Most wood species are less massive than molding epoxy. If the pieces are not properly attached to the mold, they will tend to rise and then partially float on the liquid epoxy.
From below, insert 2 screws through the piece of melamine to hold your pieces in place. Another technique is to secure from above with ties and clamps. But this reduces the ease of work when pouring in the case of smaller projects.
Important: The Temperature of the Product, Air, and Surfaces is around 24 Fahrenheit
The molding epoxy is weakly exothermic. This means that the chemical reaction of catalyzing and curing gives off less heat than regular epoxies. (Regular epoxies give off so much heat when applied in a layer thicker than 1/8 inch, that they heat, crack, bubble, or have strange effects.)
This characteristic of casting epoxy – the low exotherm – explains why the setting time is longer than that of a standard 100% solids epoxy. Normally, it takes about 3 and a half days (84 hours) to cure a 2- to 3-inch-thick coat.
It is important to note that the temperature of the product, air, and surfaces can speed up or slow down the curing process. If it’s cold, it will take longer. If it’s hot, faster. It is therefore recommended to work in a room heated to 24 Fahrenheit and to have acclimatized the product there at least 24 hours before.
It may also be noted that a thin coat of molding epoxy (say ½ inch) will take longer to cure than a thicker coat (2 or 3 inches) under equal conditions.
Related Resourse: The Advantages of Using Wood Cladding for Your Home Exterior
Calculate the approximate amount of epoxy required
To get an idea of the amount of casting epoxy required for your river table, you need to calculate the volume of the river as accurately as possible.
Here is my formula for converting a volume (cubic inches) to liters of epoxy: width (in inches) x length (in inches) x thickness (in inches) divided by 61 = the approximate number of liters required.
For example, for a river of epoxy 6 ” x 32 ” x 2.5 ” = 480 cubic inches / 61 = 7.86 liters of epoxy required.
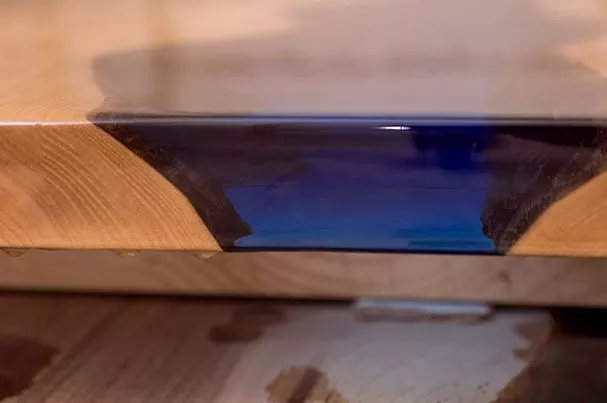
Color the resin or a colorless epoxy?
If you want a river of epoxy in color, you must first integrate the pigment into the resin (component A). Regular casting epoxy is ideal for color rivers.
For opaque colors, liquid dyes are normally used. Do not exceed 10% of the volume of the resin.
For metallic colors, powder pigments are preferred for this kind of project. A small amount of stains greatly. It is, therefore, necessary to go there gradually, little by little.
If you desire a river of colorless epoxy, I suggest you consider purchasing “UV-resistant” molding epoxy. It is more crystalline at the base and is more resistant to yellowing caused by exposure to UV rays over the years. However, it is much more expensive than the regular version, intended to be colored.
Read More: The Importance of Properly Storing and Caring for Your Wood Products
Catalyze the resin with the hardener
The mixing ratio is 2 parts resins (component A) to 1 part hardener (component B). In a clean, dry container, mix 2 parts resins with 1 part hardener.
Mix
Be sure to scrape the sides and bottom of the container while kneading. Mix for 3-4 minutes with a drill fitted with a paint mixer. After mixing, transfer the mixture to a similar container and mix again for another 1 to 2 minutes.
Once the kneading is complete, the mixture can remain in the pot and be worked for a period of approximately 6 hours.
Sink

Simply pour the contents into the mold.
If there are bubbles …
Wait 15 to 20 minutes, then heat with an embossing iron or lightly run a lit propane torch over the surface at a 45 ° angle with the torch tip at least 6 inches from the surface to the surface. ‘until all the bubbles are gone.
Carbon dioxide at the end of the flame helps the bubbles release and burst. This will help ensure a smooth glass finish. If latent bubbles are released, a similar operation after 30 minutes may be necessary. Do not attempt to remove bubbles after more than 2 hours: this will affect the smooth finish of the cast epoxy.
Protect from dust
Since the pouring epoxy takes about 3 days to cure, it is especially important to cover your custom live edge tables to protect it from dust. Personally, I normally use large cardboard or masonite.
Unmould
It is crucial that the molding epoxy has fully cured before proceeding with the mold release. Gently insert a spatula or flat trowel between the mold and the edge of the table.
You have to work in such a way as to protect your work while removing the melamine that surrounds it.